Posted on

The roll-over hoop

I have some pressing things I need to get to workwise. As such, I have defaulted to my normal procrastination tactic of finding something else completely non-urgent on my to do list to attend to. This is how I cope with panic.

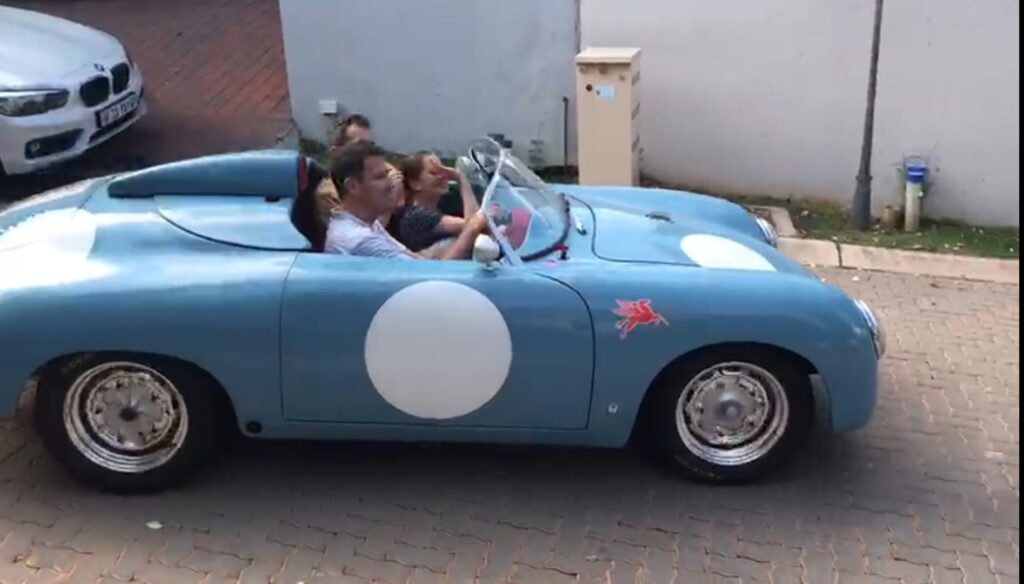
Which brings us to the roll-over hoop/ roll bar/ roll cage thing behind the driver’s head. From the very inception of the speedster project, I knew I wanted it. For the look and nostalgia of my much missed Formula Vee, the car needed one. I also had the whimsical notion that it would provide some protection in case of a roll over. I’ll confess that any ideas of ‘safety’ in a car is made of egg shells is a bit silly. I know this now that I drive the thing amongst the general public in their 2.5 ton SUVs. The only safety is to drive it veeeery carefully.

Still, it is nice to believe that if one does flip over, the first thing to contact the ground won’t be your scalp. So the bar needs to at least have some modicum of utility. Not to mention the fact that I also need a place to hang my tasty shoulder straps. I went scratching for steel structures to attach the bar to. I believe some projects have what are called ‘show bars.’ This apparently means they are connected to the fibreglass structure only. In other words, about as useful as those fake ricer tow bars that attach to a bumper with some double sided tape.

I was pleasantly surprised to discover that my car actually sports steel shoulder strap mounting points below where the B pillars normally are – there are no pillars of course, being a paper mache evocation for an already safety devoid 1950s sled. The plan was suddenly clear. I would use a ‘harness bar’ between the driver and passenger belt mounting points. Another pipe carefully persuaded into the shape of an ‘A’ s over the bullet fairing behind the driver would be connected to the harness bar as well as the floor pan on either side. This results in a flat offset ‘A gate’ (patent pending, don’t attempt this at home, all stunts performed by trained professionals) behind the seats that at least are mounted to steel parts in four places. I was briefly tempted to add side protection with another bar running to from A-pillar. This would add complication and aggravation to ingress/ egress so the idea was shelved.

Add the A-Team theme song on repeat, a very cheap and not so cheerful hydraulic pipe bender, a length of 34mm (3mm wall) mild steel pipe, an arc welder from the previous century, a bit of cardboard for a mock-up and a willing assistant (my dad) and Tan-tadan-taaa …. dan ta taaa – e voila – a wannabe race car hoop.

But seriously don’t do the theme song on repeat. It gets old after 3 minutes. You can score another two minutes by adding MacGyver’s theme, but that’s about it. Also add another day for installation and deciding whether it was going to be black or silver…

Posted on

First drive!

In the mad rush to get the car on the road, the blog has been neglected somewhat. We actually achieved start a week ago. 5L of oil went in. 10L fuel went in. Ran the pump. No leaks, good! Checked all the connections. Checked we were getting oil pressure by turning the motor over without spark. Then connected plugs. Fired off a quick prayer. Engaged starter but no spark…

Ok, start trouble shooting. Turns out the coil fuse was blown. I suspect this was due to me fiddling with the loom during installation. Replaced the fuse, confirmed 12v at the coil. Engaged the starter again and BRAAAAP!! What a sound! I couldn’t believe how awesome this little motor sounded. Truly a racer at heart.

Deo then set up the basics in timing and mixture while the motor did its first crucial 20 minutes of bedding in the cam. It needed to maintain 2000 RPM for the 20 minutes. I scurried to find us some hearing protection! This thing is loud! We wanted to take a first drive once done but it was getting late and the brakes weren’t sorted yet either.

It turned out the front brakes shoes weren’t properly seating in the newly skimmed drums. We had to reline the shoes and match them to the drums. This all took a week. Which meant we only got try again today. Brakes all sorted, first oil change done, valves set, it was time. I gave Deo the honours and we set out around the block at a pedestrian 20kph, with my twelve year old daughter and myself in the passenger seat! After we dropped her off, we drove the car 2km to the petrol station. She took 38L. We started with about 3 to 4L I think. Guess she is a sprinter, not an endurance racer!

After that it was my turn behind the wheel. It was a bit of a sensory overload at first. I was so worried that something would fail. Or that some one would wreck our maiden voyage. But everything held up. No rattles. No major hiccups. Everything pretty much worked ‘out the box.’ The gauges worked fine, albeit with a bit of a bounch on the speedo needle at low speed. Second gear proved a bit tricky to select. The clutch needs adjusting too. And there is a bit of a bind on the steering shaft at certain angles. I think I know where to go look for the cause. But otherwise it drove perfectly. The engine is super revvy and just wants to go. What a relief!

For the next week I’ll try bond with her a bit more and get a feel for the handling. Revs are being kept between 3k and 4k for now as far as possible. First impression is it actually drives a lot like a real 356, albeit with more torque. The steering, shifting and sound is actually quite similar. The sound isn’t that loud while seated in the car to be honest. The seats are pretty firm though, although they work well in the corners. Good thing that tank isn’t so big!

The project was conceived in the cockpit of a Boeing 737 in 2017. It was initiated at the start of 2019. The body was painted and returned on 29 September 2020. The first drive was 20 March 20. All considering, I don’t think we did too badly. I am indebted to Deo for constantly pursuing mechanical perfection. I think we have ended up with a pretty impressive homebuilt homage to the 1950s.

Posted on

Front suspension and brakes

There was a temptation to leave the front bit for after the first drive. Ultimately, the temptation was overcome. Probably a good thing too, because the front was NOT in good shape. The link pin holes where completely oval. The tie rods were tired. The shocks knackered. The brakes….kaput.

Skip forward a few weeks and the car is pretty much refurbished as a whole. The front underpinnings now match the rest of the car I feel. Brake slave cylinders, master cylinder, king and link pins, shocks, tie rods, shoes, drums, pedals.. you name it, its done. Should make for a better, albeit unaligned, first drive.

Posted on

Before start checklist please

What’s that old expression? 80% done, 80% left to do. We have been pushing like crazy for the last two weeks to get the car ready for that first start. It’s amazing how many small things take up all the time. It’s only 4 bolts and then engine start yes? Er no… So far the list has been:

  1. Bolt engine in
  2. Seal the engine for cooling. Nothing here is standard, so this took about a week
  3. Mount external oil cooler and filter. The cooler will still need some mesh, being located behind the rear wheel. It is a compromise between cooling and practicality. The filter is immediately behind it, which should make servicing easier
  4. Mount all associated oil piping
  5. Run the fuel line from front-mounted pump to engine. We went with a 10mm copper tube running the length of the pan, mounted with p-clamps and taking some care to give it some protection from FOD.
  6. Mount the fuel pressure regulator to firewall
  7. Fit the clutch cable (after having been shortened a second time..school fees.)
  8. Mount the pedal assembly. Cursing helps.
  9. Connect the gear selector fork. Much more cursing
  10. Enlarge the hole in fibreglass bench and fabricate cover to avoid future cursing.
  11. Connect and test temperature and pressure gauges.
  12. Figure out fuel pump relay signal from tach won’t work with electronic ignition. Reroute it to work with oil pressure switch.
  13. Mount the ignition module for the electronic distributor in a dry place (in this case the cubby hole area infront of the engine firewall. The expensive item in the picture is a loaner. We want to check that the engine runs before messing around with an unknown unit.

It’s close now. Still need some brake and front suspension work. And a tonneau cover. And a roll hoop. And shoulder straps. And and and. 80% to go.

Posted on Leave a comment

Electrics Part 2

The electrics are done. It was tedious work at certain stages, but having the knowledge that I did it myself made it worth it. The only part left over is the connections in the engine bay, which I’ll finish up when the motor is in.

Everything else it connected and tested serviceable, from wipers to rear lighting to fuel pump. I used approximately 120 male and female spade connectors, which is way more than I expected! Glad I bought in bulk! My soldering technique has improved markedly. Wax on wax off, Daniel-san.

The fuel pump has a safety relay that is powered by the negative coil signal to the tach. No spark means no pump, which is necessary in the event of an accident. For start the relay is jumpered by a red guarded switch, which allows for priming. It proudly carries the label BENZINP. All the switches are labled with an old school label maker, which I copied from the Porsche museum 718 RSK. And therefore speak German. Natürlich!

As feared, having a working horn button on the stearing wheel was a challenge. The whole column had to be insulated from the car and it took a while to work it out. Initially I relied on the sound of the horn relay only the confirm it was working. Connecting the horn to it made me realise there were a few more kinks to work out. A number of spurious and unexpected honks while working on it had me jump a few times! The fact that the SSP hub and VW indicator stalk are not really from the same era created challenge. An old scalextric brush was employed to create continuity between the two. It seems to be sorted now, but obviously some more testing may be needed while driving. My poor neighbours…

As for the reverse light, I have hidden some white LEDs behind the engine grill. This allows me to keep the rear devoid of extra fittings, which would detract from my intended race car look. Not to mention, save some cash by not having to fit the Speedster item. There is no light for the rear number plate yet, but will be easy enough to fit if ever required. The local number plates are so reflective, I fail to see the point of a dedicated little bulb shining on it.

I am amazed how bright the aftermarket LED brake lights are. I tested them without the red plastic lens and promptly blinded myself for a few minutes! I guess they’ll do the job!

I used a lot of automotive sleeving to prevent the dreaded ‘rat’s nest’ from forming. In the end, when it was all said and done, it was all cable tied together underneath the dash. It all neatly disappeared from view, especially when I flipped up the tray and used a wing nut to secure it. Out of sight, out of mind.

Posted on Leave a comment

Electrics Part 1

As someone who has barely installed a new head unit into a car’s dash, the task of wiring an entire car is big one.  I decided to start as the front and progressively work my way back.

Before starting, I had amassed a mountain of heat shrink, a hundred male and female spade connectors, a 30m spool of automotive wire and a generic wiring loom from a 4×4 shop, complete with extra long wires. This was not enough. I am dumbfounded how much wire such a simple car has swallowed up.

I suppose I could have saved some distance if I kept to the beetle layout of the battery in the back, but this is a thoroughbred genuine imitation racecar! The weight of the battery needs to be as far in front and as far away from the driver’s side as is physically possible (ie front left corner,) which is sadly as far removed from the starter motor as is physically possible. This means that finding the path of least resistance for the battery cable would be a  challenge. In anticipation of the job, I had made a channel with sheet metal on the inside of the passenger sill while doing the interior. It would descend from the left side of the dash, traverse the cabin and pop out the back where the rear bench normally is. The wiring harness could utilise this channel, but the path would be too long for heavy gauge battery cable. Considering that my engine would be too thirsty for the stock fuel line in any case, the tunnel was available. After adding protective sheathing it only took me several hours and multiple bruised knuckles to get it through the tunnel and out the back! Easy!

The negative cable passes along the front of the nose, up the right side of the frunk to the battery disconnect on the scuttle. After that it firmly earths into the steel frame of the body, below the dash. There are many pros and cons to adding a disconnect to either the positive or negative side and many potential barroom arguments for either case. In the end, I chose the latter, for reasons I won’t bore you with.

From the starter, via the alternator, another lesser but still beafy cable returns via my fabricated channel to a magneto style ‘on/off’ switch on the dash. From here power flows to the generic fuse box which I mounted on a hinged tray below the dash. The tray also houses my tach adapter, fuel relay and relays necessary for having a trick DLR halo/ alternating indicator setup. I guess I have crossed over to the restomod side of the spectrum. Buy I digress. There is no ‘hot bus’ on this car. Flick the master switch to ‘on’ and the daytime running lights come on. The starter is engaged by a button on the right of the stearing wheel. Fuel primer, lights, wiper and spotlights are toggled by reappropriated Boeing 737 guarded switches. They are probably worth more than the car in the right market… From here the loom branches either forward or back through the channel again. At the moment I’m just going through each item bit by bit. I think it is important to remain methodical and calm, especially while the amount of wiring starts adding up in a disconcerting manner! If In don’t accidentally strangulate myself with automotice wire, I will report back on the finished electrical system hopefully soon.

Posted on Leave a comment

The frunk

I intended to start the daunting task of doing the wiring. I decided that the best approach would be to make a provisional mock-up of it on the garage floor. But then the floor was still covered in heaps of carpeting. So my attention diverted to finishing up all of the carpeting in the front hood/trunk/boot/frunk area. I am the master of procrastination.

Here is the result. It is probably a bit plush for a ‘racer’ but bare fibreglass looked a bit meh. I succesfully fought the urge to splatter the inside of the bonnet with leather diamonds.

While in there, I worked out where the battery cables and front loom will go. The battery itself was secured with the same stainless straps holding down the tank. The tank overflow was routed to the outside. I also made a pouch for the toolkit. The floor of the frunk got some of the same rubber mat as in the cabin. It’s pretty tough and adds some welcome sound deadening. Lastly I superglued the d-shaped weatherstripping into place. Yes superglue. I’m still amazed how well it worked!

There is floor space now. Let’s see what else I can find to do before starting the wiring!

Posted on Leave a comment

Carpets etc

In the mad scramble to get it Resin Racer done, I seem to be hopping around a bit (and neglecting the blog!)

There is a steering wheel, a windscreen and some pedal work,  but for this update, I’ll chat about the interior only.

The bottom part of the hard tonneau is on the car. I’m pretty happy with how it came out. If used the diamond pattern in red leather , as with the doors, on the bottom of it. No one will ever really see it, but it finishes it nicely and I couldn’t think of a better way to do it.

The carpeting inside the cabin is pretty much done too. I’ve kept it fairly neutral and resisted the temptation to go ballistic with the red leather. The binding/edging vinyl is exactly the same colour as the carpet, which is probably a bit boring, but I was hesitant to introduce another colour. That said, I think the red leather and tan carpet makes a statement! The compound curves around the shift lever and hand brake makes for tricky carpeting on the tunnel. I was going to use the same tan vinyl that I used for binding and just stretch it over the curves, but then decided to go a bit avant garde and use the red instead! I dislike a big boot around the shifter and brake as per most replicas.  I like to think this way I’m acknowledging the fact this is a beetle pan without actually using a boot.

I couldn’t help myself and did the lap belts too. They are 3 inch wide overkill I know. The shoulder component will have to wait until I can do the roll bar. They attach medially at the stock points on the tunnel (late beetles have them) and laterally onto brackets I fabricated. I tried to beef things up by using two bolts into the pan each side. Still, belts in a fibreglass kitcar is probably mostly lip service.

I decided not to do carpets below my feet, but just some rubber mats. They look the period part, will be easy to keep clean and shouldn’t move around too much. They should also assist with sound insulation. Dirty shoes on car mats is a pet peeve of mine.

Lastly, I also addressed the sills. They seem to be often overlooked in homebuilt cars. The actual 356 has a very impressive wide sill, so I at least wanted to have something similar. I commited a few days of experimentation with aluminium profiles and eventually came up with something that uses the real car as inspiration, but looks adequately bespoke and, more importantly, adequately finished.

Posted on Leave a comment

Seats, door straps and engine bay insulation

I am finding it hard to do just one item and enjoy the process. I should take my time and stretch it as far as possible. Buy my enthusiasm is making this impossible.

I managed to get the seats mounted. I had big plans using the original beetle rails as the base. Turns out, thanks to the 30cm shorter chassis, they are way too far forward to be of any use as seats mounts. I have kept them for the moment, as they may still be useful as mounts for the anti-submarine strap ot maybe a fire extinguisher. Time will tell. The seats themselves mount on square tubing (acting as spacers and assists in getting the height perfect) which in turn mount on universal sliders which in turn are bolted directly to the floor. The arrangement makes for a pretty low seat position, which I like for this car.

While busy getting in and out of the car, the door hinges suffered a few maximum deflections. This surely can’t be a good thing. I decided that the door limiting straps needed to be done asap. I used the old beeltle fuel tank brackets as the strap ends and the red leather stitched over carpet off-cuts as the straps. Although they seemed unstretchable before being mounted, once on they almost act like bungies. They work fine but won’t last. I’ll rethink a more permanent solution.

I decided the engine bay needed some finishing before we start getting serious on the mechanical side. I had some fire retardant fibreglass cloth left ovet from a previous project and decided to repeat the same pattern as with the doors. The fabric is stitched over heat shielding foam I found at a rubber store. It is done with the same high strength cotton thread as used in the interior. Hopefully it will last a while. It should at least last longer than the leather clad engine bays as used on some restomods, while still providing some texture and detail.

Posted on Leave a comment

2 Weeks in…

I have had my car back from the bodyshop for two weeks. I know I should be enjoying the process and tinker away for the next few years. This way I may never be bored again!

But no! I’ve been imagining the build for almost a year. I want to push as hard as possible. I want to do at least one item per day. As the list is pretty clear in my head, but not written down anywhere, it is effectively a mad scramble without any obvious bearing at the moment. So therefore, in no particular order of priority or relevance or sense, the list of things done so far is as follows:

  1. Temporarily put on the new wheels and chucked out the old dummy ones. The old ones had spacers and 5 to 4 stud adapters. Whoever had put them on, had no concept of mechanic sympathy or torque values. It was several sweaty hours and some regrettable blasphemy to get them off.
  2. Fitted and aligned the engine lid
  3. Fitted the engine lid grill. Necessitated taping a nut to a screwdriver to get it onto the bolts. Joy.
  4. Fabricated fuel tank mounts and a new firewall. I had to demolish the old one. I don’t want to share why this became necessary…
  5. Aligned bonnet with reference to gaps and centre fill tank. Rediscovered the value of a fulcrum to get the top edge to sit.
  6. Fitted the doors. Not a one man job. Much pulling of hair, sweating, swearing and further regrettable blasphemy.
  7. Decided the pan looks terrible after spending months at the bodyshop. A few rust spots received deoxydene and then I painted the exposed areas with a rattle can. Before ye judge, most of it is ending up below carpet and in anycase, in High Heat Black I trust
  8. Removed pedal assembly
  9. Attached instrument cluster eyelid. Love it!
  10. Fitted the pull cables to the doors. This is basically 5mm steel wire rope covered in PVC, attached to the stock beetle door mechanism and one of the door hinge bolts. It is ridiculous how easy this was and how pleased I am how it came out. I was going to cover the cable in leather, but I think it matches the rest of the car better if left raw.
  11. Glued in the diamond pattern door panels with contact adhesive into the door recesses. My hands still covered in glue, but I’m happy and relieved! It’s done and looks exactly like I hoped.
  12. Secured fuel tank with stainless steel straps.
  13. Fastened the upside down dog bowl onto tank.
  14. Sat on loose seats and made engine noises. Brrrrm brrrrm.

So far so good. Just about managing an item per day. I may be doing the quick, easy items first though. Expecting things to escalate!